My Experience at My First Artist's Alley
Overview
My first ever experience as an art vendor was at Ramapo during the on-campus arcade event hosted by the Rhythm Games Club (11/22/25). It was a charming little event filled with individuals passionate about gaming and art! I am grateful that I was offered this opportunity and will forever remember it.
I have decided to create a post-event summary and reflection for both myself and other artists out there that are wondering what it's like. This blog post is also for those that are curious about my process and want to take inspiration from it/learn new tips.
My Process
Funnily enough, I was informed about this event on my birthday (10/22), so that was a nice gift. Though, that meant that I had about one month to prepare goods... and boy did I prepare (so much so that my face broke out terribly due to all of the stress).
1. Creating Ideas for Goods
For a few years, I have had a rough idea as to what I wanted to sell as an artist. Some of my biggest dreams were to create stickers, keychains, and prints. There was one small issue with this though...
I didn't know EXACTLY what I wanted to create. I just knew what form I wanted the final product to take on.
While knowing the final forms of products without knowing the actual art itself is not an inherently terrible thing, it really sucks when you're on such a tight schedule and are looking at manufacturers based in China as an individual living in the USA in 2025 (iykyk). I will say though... understanding what type of form I wanted my products to be in actually inspired my creative process a bit more than one might imagine.
After taking a good amount of graphic design classes, and with a degree under my belt, I have come to learn that project constraints are the one of the best ways to get your creative juices flowing, and often help you to create some insanely unique designs. I often ask myself how I can push the limits of the project without breaking them. For example:
- How can I use my elementary-level sewing skills to create a small, yet complex-looking keychain?
- How can I alter my already existing business card to create something that better represents me while following the manufacturer's guidelines?
- How can I create a relatively small print that is within the realm of colorful chaos (my style), while also not feeling cramped?
These same classes also continued to push a major concept: BE INSPIRED BY OTHERS (but don't outright steal ideas)! This is especially true for when you're selling these goods on a larger scale, like an artist's alley. What is trending currently? What style are other people using for x product? What is an effective size for x product? And so on... At the same time, this inspiration can lead you to completely stray away from the norms in order to stand out, which is another positive aspect of being inspired.
With these ideas and practices in mind, I began to gather my inspirations (both on Pinterest and Instagram) and create!
1.1 Stickers
These were both the easiest and most difficult products to create in my opinion. Stickers are such a simple concept, yet are arguably one of the most expressive pieces of stock that an artist can have. I knew that I wanted to appeal to a wider audience, but I also knew that I wanted to stick with my biggest loves: silliness and bears.
My idea was to create a collection of bear stickers with various expressions and outfits: simple and not too niche. It felt like the most appropriate thing to do considering my brand, Mokumas, is based on bears.
With that, I came up with four ideas:
- A stupid smiling bear
- A chaotic bear with fire in the background
- A bear dressed up in an oversized strawberry costume
- Dango but with bear faces
The first idea actually sprouted from a drawing that I made a day after signing up for the event (you can find it here). Initially, I intended it to be a simple positivity drawing, but that stupid face kept me up at night and I NEEDED him in my hands as a sticker.
The second idea came from a common concept within the sticker community: a cute character in an insane scenario, representing the sticker holder's internal chaos. It was genuinely hilarious seeing the final result because it's just such a stupid looking thing.
The third idea came from the observation of customers often loving the concept of their favorite food being combined with a silly character. In the end, I choose a strawberry costume for the bear, which I've noticed to be a popular fruit in general. I have toyed with this idea further in an Instagram reel (you can find it here).
The fourth, and final, idea literally comes from the fact that I love the color and shape of dango. The dango emoji is in my bio. What did you expect?
1.2 Prints
I think that the process of creating my prints was the easiest (considering I drew both of them in the same day and they stuck with me SO HARD).
I ended up creating two designs: a bear-faced crepe and a Tamagotchi Angel. The first design came to me in a bout of inspiration while thinking about cute foods (I was also craving crepes). The second design was something that I had wanted to draw for a while and finally had a good enough excuse to do so. If you'd like to see the creation process of the Tamagotchi Angel print specifically, you can find it here.
1.3 Keychains
This was the most difficult group of products to create, alongside the stickers, purely because of how much time it took to actually make everything.
I'm sure many of my friends can vouch for this when I say that I am a huge advocate of doing things yourself when possible. DIY and it's culture is so incredibly important to me, which is why I chose to hand-make ALL 31 of my keychains. While I love acrylic charms and keychains that many manufacturers can produce, nothing beats the charm of a handmade object.
After searching for inspiration in a Pinterest board filled with various physical crafts that I've had for a while, I landed on a few different product ideas:
- Felt strawberries
- Felt apples
- Felt stars
- Felt bones
- Clay emoticons
Here's a confession: I haven't been sewing for very long. I first learned how to properly sew while I was in high school during my senior year, and that was only TWO stitches. I only learned how to do other stitches less than a year ago (at the time of me writing this). It's safe to say that I am still a total noob at sewing. Moreover, I chose to use felt as this is the only medium that I am comfortable with sewing, considering that it's the only thing I sew with nowadays.
I actually found a template for the strawberries online and decided to first try it out. At this point, I had never worked with actual stuffing in my felt projects, so I was really focused on creating strong stitches that would hold the piece together when flipped inside out. All things considered, it was an extremely easy thing to create as someone who is still a bit of a beginner. This is also the first project that I used embroidery thread for, which I've never used in the actual embroidery sense (sewing on designs for aesthetic purposes, rather than sewing for strong connections between two pieces of fabric). I had SO MUCH fun creating those guys and squishing them after they were complete. My only issue with creating them was figuring out a way to make them into keychains, as I couldn't think of a "pretty" way to create a loop for a ball-chain at the time. At the last minute, I decided to sew a loop of green embroidery thread at the top of the leaves. I think that was the best idea given my circumstances, and I've found that connection to be rather strong.
The apples were one of the easiest products to make as they were only three pieces of felt sewn together with two embroidered seeds and a harder felt stem acting as the keychain loop. This process is what taught me one of the methods of how to create a strong connection for the ball-chains, and I realized that a glued together loop of harder felt would provide the best security while also remaining aesthetically pleasing and fitting.
I think I am most proud of the stars. While embroidering the seeds for the strawberries was time consuming, it wasn't anything too difficult nor precise. I decided to up the challenge level by embroidering faces onto the front of the stars, both to prove my worth and to give them more personality. None of the faces ended up coming out perfect, with some being too low and others being too close together, but I'm not upset about that. Creating things by hand means that you are working with your mistakes while aiming for your limits of perfection. Like the apples, I employed a similar technique of using a loop of hard felt glued together as the ball-chain connection. These definitely turned out to be one of my favorite pieces of stock.
The bones were actually made last minute (like... less than a week before the event). I created them out of fear that I wouldn't have enough interesting things to sell. There's not much to say about them as I made all 6 of them in one sitting while watching Northernlion play The Binding of Isaac. The only thing of note is that this is where I discovered and experimented with the loop of embroidery thread as a connection for the ball-chain.
Finally, the emoticon charms. These were the first physical products I created back in October and I was beyond excited to execute the idea. I had created similar charms about a month prior and found the process of painting and using resin to be fun. Unfortunately... literally everything went wrong during the creation process. Firstly, the white paint that I was using was so cheap and terrible. It took way too many coats to become opaque and barely stuck to the clay's surface. Then, I started to use resin on some of the charms after learning new techniques a few days prior. Somehow, dust got into some of the charms during the curing process, some were uneven, and one was literally unusable because too much resin got onto the eye pin. After those catastrophes, I only had a few unsealed charms left, so I decided to switch to a glossy acrylic varnish as a sealant/finish. Luckily, this worked really well and has become a go-to for simple charms.
2. Final Creations
Upon completing my products, my headaches and stress reduced drastically! Overall, I am incredibly proud of and happy with everything that I made. I like to see my products as a culmination of my creativity, ever-growing skill, and dedication to the craft.
I'm sure a handful of you skipped to this section to actually see my products, so here you go:
2.1 Stickers
Joyous Bear

Fire Bear

Strawberry Bear (Strawbeary)

Dango Bear

2.2 Prints
Tamagotchi Angel / Digital Version, Better Quality

Bear Crepe / Digital Version, Better Quality

2.3 Keychains
Strawberries

Apples

Stars

Bones

Emoticons

3. Manufacturers
I heavily researched which manufacturers would best suit my needs while also abiding by my values, and I found two that fit!
3.1 Vograce
Vograce is a manufacturing company based in China with a plethora of affordable product options for artists! I was initially very reluctant to order anything outside of the US considering the whole issue with tariffs, but Vograce has its customers covered in that regard! Shipping came out to be under $8, which was impressive.
I used their service to create my stickers at a 2.5 inch scale. Within a day or two of submitting my files, they sent back proofs for my stickers and I instantly approved them. Working with them was a breeze! If anyone is looking to get their art manufactured at an affordable price, I would definitely consider Vograce.
3.2 Fireball Printing
Fireball Printing is an artist-run print shop located in Philadelphia, PA. While researching, I found only positive reviews about the place and their services. Their services are reasonably priced considering real humans are putting in the work.
I used their service to create my prints at an 8 x 8 inch scale, alongside my business cards. It only took about a week to arrive (being based in PA also helps), and I was shocked with the quality of my goods. I could tell that they put a lot of care into them! Everything arrived well-packaged and nothing was bent! If Fireball Printing's services are within your budget, I implore you to go out of your way to use them. I will definitely continue to work with them!
4. Signage
One of the most important parts of your table at an artist's alley, outside of the products themselves, is your signage! People need to know who you are, what kind of goods you're selling, and for what prices.
You'll see in a later section that I already spent a bit of money on other items for my table, so I really didn't want to spend any extra money if I didn't have to. Thus, I REALLY pushed my DIY values to the max and hand-painted all of my signs.
Am I crazy? Yes. Was it worth it? Yes!
I create two main signs, one of which was my logo, and the other was my character. I also created a sign urging visitors to take a business card, as well as my prices.
Before creating any of the signs, I made a simple batch of sketches to get a general idea of the vibe that I was going for:

All of my signs were created with cardboard, more specifically a 2-pack Cheezits box. The creation process was simple:
- Create paper templates of designs
- Prime cardboard with gesso
- Transfer designs onto cardboard with a graphite transfer method
- Cut out designs
- Paint! (the hardest part)
- Seal with gloss varnish
Here are my two main signs:
Logo

Character (Kohi)

You'll notice up-close that it's pretty obvious that these signs were done by hand. From afar, however, it's pretty difficult to tell. Both of these appearances were my main goals!
Fun fact: prior to this, I had never hand-painted text, nor painted something that needed to be as clean as these signs. It was an extremely fun, yet stressful challenge. When I finished, I discovered a new passion for painting such signs!
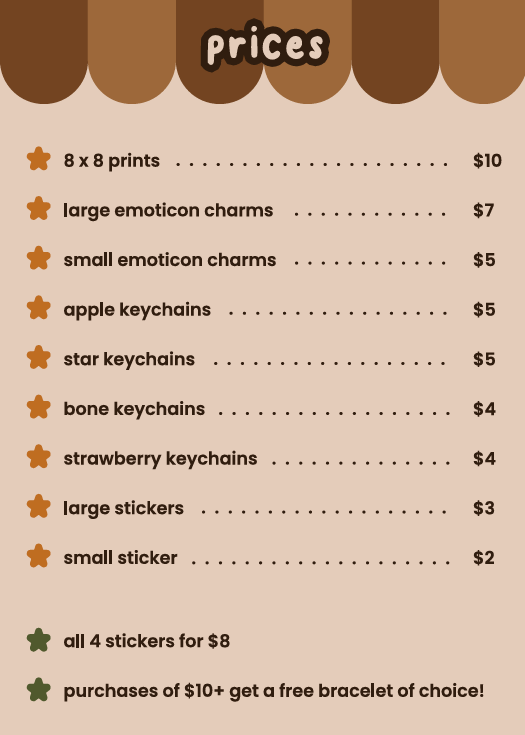
Later on, I also designed a simple "price menu" in Adobe Illustrator to quickly outline prices to those that wanted a more clear-cut explanation of everything. (Excuse the quality, it's a screenshot of a PDF).
My Artist's Alley Database
I always want to be organized and in the know when it comes to my productivity system, and this especially applied for the preparations during this event. This small, yet information-dense database saved me so many worries and helped me to narrow down my ideas during the creative process. It is without a doubt that I will continue to improve and use this system in the future. I implore all artists looking to sell their goods, both in-person and online, to create a similar system in order to stay organized!
What Does it Contain?
My database can be divided into three sections: calculations, setup, and a checklist. With these three sections, I was able to clearly outline my goals, ideas, and final preparations without any unnecessary stress.
Section 1: Calculations
In this section, I created two tables: one for money spent and one for the prices of my goods.
The table outlining the money that I had spent stated the product, manufacturer, quantity, and base price. At the bottom, I added additional shipping costs. This table helped me to create fair, yet profitable prices for each of my products in order to reach my final monetary goal (that being to make up these production costs).
The table outlining the prices of my goods stated the product, quantity, and price. Here, I was able to quantify how much of each good I had and create a total amount of goods (better for mental visualization). With this, I calculated how much money I could make if every item was sold. It's a simple, yet necessary thing that all artists should do when attending an event!
There was also a small sub-section under the prices of goods that detailed any deals occurring during this event. I created two deals to encourage larger purchases:
- Buying all 4 stickers would be $8, instead of the usual $11 (you're essentially getting one sticker for free)
- Making a purchase of $10 or more gets you a free bracelet
Section 2: Setup
This section was simply a dump of various Amazon links for display items that I considered buying. I created the list early on prior to completing my products and later condensed it down to six necessary items:
- Cube grids
- Clear, moveable sign holders
- Business card holder
- Mylar bags (for stickers and keychains)
- Plastic sleeves (for prints)
- Tablecloth
I did not add my setup costs to my overall cost of attendance considering most of it was covered by interest accumulated by my savings account that month (basically free money) and I knew that I would be using the items in the future, so it didn't hurt as much. Though, I would not recommend doing this. Please always consider every single cost and calculate your prices/goals from there!
Section 3: Checklist
The final section was a long checklist, divided by type of item, that helped me during the packing process. I derived many of these items from helpful artist's alley Instagram posts that I had collected during the month leading up to the event!
Here are the sections that I used and some example items:
- Products (stickers, prints, charms, business cards)
- Storage/Packaging (mylar bags, plastic bags, containers)
- Display (cube grids, tablecloth, business card holder, clips, signage)
- Misc. (painter's tape, post-its, extra keychain attachments)
- Personal (phone, wallet, keys, water, cash)
While packing the night before the event, I went over this checklist a few times to ensure I had everything. Then, the day of, I went over it again just in case I happened to miss anything/remember something else to bring. This checklist alone saved me SO MUCH stress!
Creating an Environment to Sell in
With everything planned, I had to actually design my table. I haven't said this yet, but I shared a table with my boyfriend, thus adding to the challenge. I needed to find a way to create a cohesive display for both myself and him with such a, now even more, limited space.
The first thing I did was look through my inspiration photos I had saved previously on both Pinterest and Instagram to see how others make it work, both with limited spaces or full tables.
With that, I created a simple sketch:

This initial sketch outlined my ideal layout prior to receiving my display items. Once they arrived, however, I began to notice how small the cubes really were.

There wasn't enough vertical height to grab people's attention, nor did I have enough space to display the strawberries and bones.
Later on in the week, I redid everything and came up with this:
 (Oh yeah, I also painted my boyfriend's signs too!)
With this final image, I was confident that our setup would work out and that we would be eye-catching enough. Upon arriving to the event, we managed to set up our table relatively quickly since we had a reference to go off of. I suggest any artist looking to attend an in-person event to do the same and take pictures of everything you'll have to set up BEFOREHAND!
Some Tips
It can be difficult creating an eye-catching display as an artist on a budget. Here are a few of my personal tips that can help improve your setup drastically for CHEAP!
- Find out what other artists are doing with their displays (I've found great luck on Pinterest and Instagram)
- Create a sketch (or multiple) of your ideal display (make it realistic)
- Write a list of display items you'd like to purchase (see My Artist's Alley Database, Section 3 for more information)
- Create signs at home when possible (printing, painting, etc.)
- Play with different layouts when you have received all of your display items and products
- Take a picture of your final display at home as a reference for the event (huge timesaver)
Final Product
My display

My boyfriend's display (I can't find a full picture with his logo at the top, sorry)

The Good
Now that I've wrapped up my lengthy summary, I'd like to provide a list of the good things that I noticed with my process, products, display, and time at the event!
Process
- I worked incredibly hard and diligently to meet deadlines
- I created detailed workflows and lists (my database, random notes in notebooks) in order to stay organized
- I did plenty of research on manufacturers and took lots of notes on them
- I did plenty of research on how to display my goods
- I created clear sketches of my ideas
- I was clear with what I was creating in general
Products
- Everything came out clean and worth selling (in my opinion)
- My products contained a lot of my brand's charm and whimsy
- Many were broad enough to reach a wider audience
- People like trinkets!!!!!!
Display
- There was a lot of vertical height, thus helping my table to stand out
- My goods were clearly displayed
- Nothing felt cluttered
- My signage fit well with my brand
- People were impressed with the overall display and signage
- It was cute!
At the Event
- I was friendly with everyone that came by
- I explained my products clearly to those who asked about them
- I made sure to include my business card and two Hi-Chews in my packaging
- I packaged my goods quickly
- I gave out freebies to a lot of people and helped to improve my brand's image
- I made it a challenge for people to follow my Instagram in exchange for tickets (the event's currency for prizes). I ended up gaining about 10+ followers! I also became mutuals with some of the artists
What Needs Improvement?
While there were many good things that I observed, I also found a handful of errors that I would like to learn from and improve upon in the future.
Process
- I nearly worked myself to death. I mentioned in the beginning that my face broke out terribly (which hasn't happened in years). I was barely drinking water or eating healthy
- I didn't outline my plans as early as I should have (I kind of went in blind)
Products
- Many of my products did not reach my target audience. This was primarily a gaming event that happened to feature an artist's alley. I should have created other products that aligned with this audience
- I didn't have as many items as I wanted (thanks to the mishaps with my clay charms and resin)
- My fire bear sticker, in particular, came out WAY too dark. I knew that would happen, but I never did anything about it. I regret not altering the colors before getting them manufactured
Display
- While great for my budget, it didn't feel as "professional" as I wanted it to be. In the future, when I have a full table to myself, I will look into more display items to take up the whole space
- My products were not labelled clearly. In my sketches, I planned to create signage that said "prints", "stickers", and "keychains", but I was so burnt out that I didn't have the energy to do so. This definitely affected my sales, specifically with stickers
- As much as I loved DIYing my signs, I need to get them printed. Those signs alone were one of the biggest stressors. They were also rather small
At the Event
- I didn't sleep well the two nights leading up to the event, so I wasn't entirely there. My boyfriend said that I might have come off a bit unapproachable
- We arrived on time, but cut it very close to the start time of the event, so we were rushing to set up (which added to my stress and I ended up kind of ignoring some people. Sorry!!!!!)
- I didn't connect with other artists/explore other tables! I regret this so bad
Final Thoughts
Despite all of the stress and lack of sleep, I had a lot of fun!
I want to give a huge shoutout to those that purchased goods from me and gave me compliments that night; it meant the world to me! I deeply struggle with impostor syndrome and almost didn't even consider joining the event in the fear that no one would like what I was selling. Seeing the smiles that my goods brought to other people, those begging their partners to let them buy something, the genuine interest in my work, the excitement from receiving candy and bracelets... it made the journey all worth it.
Another huge shoutout to the Rhythm Games Club for hosting this event! The evolution of your club has been awesome to witness and I am beyond happy that you guys are seeing such successful events. I can't wait to attend future events featuring artists 👀
With this chaotic span of time behind me, I will continue to work harder on my brand and art, while taking a very necessary break. I have come to realize that this is my passion, and this event truly solidified it.
If you'd like to see my growth, you can find me on Instagram and Tumblr! (I am looking into starting a YouTube channel, creating a new website (with my own domain), and opening up an online shop, so stay tuned for announcements regarding those!)
If you got this far, thanks for reading. It means a lot :)